In terraria, tiles that don't have a U/V coordinate stored in the map will have their U/V coordinates calculated at runtime. The calculations involve the types of tiles that surround the tile, as well as a small bit of randomness. I will cover the three main types of tile textures, as well as the rules that determine which part of the texture is shown.
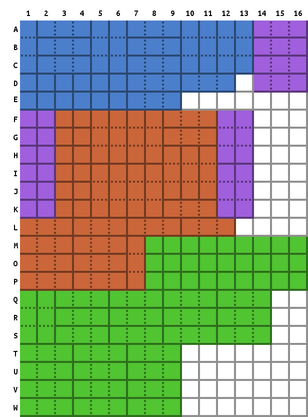
The figure to the right is the overall tile texture template. Pretty much all calculated tile textures (with the exception of #19—wooden platform, and #80—cactus) use a part of this template. There are four notable areas of the template. The first area, marked in blue is the "base zone". This zone is used by all tile textures. Wall textures are comprised of solely this base zone. The second area, marked in purple is the "blend zone". This zone is used by tiles that blend with dirt. The third area, marked in green is the "grass zone". This zone is used by grass textures. The final area, marked in orange is the blend/grass zone. This zone is used by both blend and grass textures.
It looks rather complicated, but breaking it down into zones makes it easier to work out. A grass texture would first check rules that fall in the green "grass zone" and the orange "blend/grass" zone. If it failed to find a match, it would then check rules that fall in the blue "base zone". It will definitely find a match in the base zone, since it has the broadest rules.
Finally, There are 3 types of tiles that use these textures. Grasses, which are all the grasses (corrupt, hallowed, normal). These use the grass zone, the blend/grass zone, and the base zone. Tiles which blend into dirt, these use the blend zone, the blend/grass zone, and the base zone. Finally tiles which aren't grass and don't blend to dirt. These use the base zone only.
One note about blending. You might think that stone and gemstones "blend" with each other. They don't. Stone and gemstones are considered the same thing. When checking the neighbors, ruby will treat nearby stone as more ruby. Ruby will treat nearby emerald as more ruby. Stone will treat any gemstone as more stone, and so forth.
The texture grid is actually 3 times bigger than it needs to be. You'll see several blocks are joined by dotted-lines into a 3x1 or 1x3 area. These actually represent a single tile, but with 3 different variants. The particular variation is chosen randomly, this gives repeating textures some "noise", and makes them interesting. Every texture block has 3 variations. Looking at the template, you can see A1, B1, and C1 are all variations of each other. Basically they all match the same ruleset. However, you'll notice that D1 doesn't seem to have any variants. It does, but they're not grouped together. D1, D3, and D5 are all part of the same group. D2, D4, and D6 are a group as well.
Now that we have an overview, let's look at the rules. Basically, what we care about are the tiles that surround our tile. We care which, if any, of these tiles "match" our tile. A match could mean the adjacent tile is the same tile type, or it could mean the adjacent tile "blends" with our tile type. We then choose the texture that fits.
Let us look at a very limited example, let's just look at a tile (call it X), and take into consideration the tile next to it (call it Y). There are 3 different possible states. State 1: X and Y are the same type. State 2: X and Y are different types, but can blend. State 3: X and Y are not the same.
Naturally, in this very limited viewpoint, there would be 9 different tiles for those 3 different states (Don't forget each tile has 3 variations, that's why there are 9 tiles in this case, not 3).
If you're doing the math, you'd see that for 8 surrounding tiles (up, down, left, right, upper left, upper right, lower left, lower right), and 3 states per relation, there would be 512 different states, and 1,536 unique textures per texture file. Of course there aren't that many blocks in each texture file, not by a long shot. This is because not every possible state has a unique texture.
For the most part, only care about the corner tiles in very specific circumstances. In the following tables, the corner tiles can be anything, unless explicitly marked as included or excluded (with "!"). The same can't be said for the edges. If an edge isn't listed, then it must not match.
For example, A7-A9 in the Base Zone shows a single match of Bottom. This means that the tiles to the Top, Left, and Right must not match, and the corner tiles can match or not, it doesn't matter.
The corners are represented by TL = Top Left, TR = Top Right, BL = Bottom Left, BR = Bottom Right.
Another example is A11-C11. In this case, all the sides must match, but the Top Left and Bottom Left tiles must *not* match. We don't care whether or not the Top Right or Bottom Right tiles match.
Now let's look at the actual base zone, and the tile rules that determine which blocks to use. With the base zone, we don't care about blending, we only care if tiles match, or don't match.
| Tiles | Matches |
|---|---|
| A1-C1 | Top, Bottom, Right |
| A2-A4 | Left, Bottom, Right |
| A5-C5 | Top, Bottom, Left |
| A6-C6 | Top, Bottom |
| A7-A9 | Bottom |
| A10-C10 | Right |
| A11-C11 | All, !TL, !BL |
| A12-C12 | All, !TR, !BR |
| A13-C13 | Left |
| B2-B4 | All, default |
| B7-B9 | All, !TL, !TR |
| C2-C4 | Left, Top, Right |
| C7-C9 | All, !BL, !BR |
| D1,D3,D5 | Bottom, Right |
| D2,D4,D6 | Bottom, Left |
| D7-D9 | Top |
| D10-D12 | Nothing |
| E1,E3,E5 | Top, Right |
| E2,E4,E6 | Top, Left |
| E7-E9 | Left, Right |
This zone is for tiles that blend into dirt. These rules should be checked alongside the rules for Blend/Grass zone. If those rules fail, mark all blends as "not a match" and try the Base zone.
| Tiles | Matches | Blends |
|---|---|---|
| A14-A16 | Left, Right | Bottom |
| B14-B16 | Left, Right | Top |
| C14-C16 | Top, Bottom | Right |
| D14-D16 | Top, Bottom | Left |
| F1,H1,J1 | All | BR |
| F2,H2,J2 | All | BL |
| F12-H12 | Bottom | Left, Top, Right |
| F13-H13 | Right | Top, Bottom, Left |
| G1,I1,K1 | All | TR |
| G2,I2,K2 | All | TL |
| I12-K12 | Top | Left, Bottom, Right |
| I13-K13 | Left | Top, Bottom, Right |
This zone is for tiles that are considered grasses. Corrupt grass, hallowed grass, etc. These rules should be checked alongside the Blend/Grass zone rules. If those blends fail, all blends should be marked as a match (this is different than the tiles which use the Blend zone), and then you should try the Base zone.
If a side or corner is in both the matches and blends column, it means either one can match.
| Tiles | Matches | Blends |
|---|---|---|
| M8,M11,M14 | ---unused--- | ---unused--- |
| M9,M12,M15 | Left, Bottom, Right, !BL, !BR | !BL, !BR |
| M10,M13,M16 | ---unused--- | ---unused--- |
| O8,O11,O14 | Top, Bottom, Right, !TR, !BR | !TR, !BR |
| O9,O12,O15 | All, !TL, !TR, !BL, !BR | |
| O10,O13,O16 | Top, Bottom, Left, !TL, !BL | !TL, !BL |
| P8,P11,P14 | ---unused--- | ---unused--- |
| P9,P12,P15 | Left, Top, Right, !TL, !TR | !TL, !TR |
| P10,P13,P16 | ---unused--- | ---unused--- |
| Q1-S1 | Right | Top, Bottom |
| Q2-S2 | Left | Top, Bottom |
| Q3-Q5 | Bottom | Left, Right |
| Q6-Q8 | Bottom, Right, !BR | !BR |
| Q9-Q11 | Bottom, Left, !BL | !BL |
| Q12-Q14 | Bottom | Left, Top, Right |
| R3-R5 | Top | Left, Right |
| R6-R8 | Top, Right, !TR | !TR |
| R9-R11 | Top, Left, !TL | !TL |
| R12-R14 | Top | Left, Bottom, Right |
| S3-S5 | All, !TL, !BR | |
| S6-S8 | All, !TR, !BL | |
| S9-S11 | Right | Top, Bottom, Left |
| S12-S14 | Left | Top, Bottom, Right |
| T1-T3 | Left, Bottom, Right, BL, !BR | BL, !BR |
| T4-T6 | Left, Bottom, Right, !BL, BR | !BL, BR |
| T7-T9 | All, !TL, !TR, !BL | BR |
| U1-U3 | Left, Top, Right, TL, !TR | TL, !TR |
| U4-U6 | Left, Top, Right, !TL, TR | !TL, TR |
| U7-U9 | All, !TL, !BL, !BR | TR |
| V1-V3 | Top, Bottom, Right, !TR, BR | !TR, BR |
| V4-V6 | Top, Bottom, Right, TR, !BR | TR, !BR |
| V7-V9 | All, !TL, !TR, !BR | BL |
| W1-W3 | Top, Bottom, Left, TL, !BL | TL, !BL |
| W4-W6 | Top, Bottom, Left, !TL, BL | !TL, BL |
| W7-W9 | All, !TR, !BL, !BR | TL |
Used by both Grass and Blend tiles.
| Tiles | Matches | Blends |
|---|---|---|
| F3,H3,J3 | Bottom, Right | Top, Left |
| F4,H4,J4 | Bottom, Left | Top, Right |
| F5-H5 | Top, Right | Bottom |
| F6-H6 | Top, Left | Bottom |
| F7-H7 | Bottom | |
| F8-H8 | Top | Bottom |
| F9-F11 | Left, Top, Right | Bottom |
| G3,I3,K3 | Top, Right | Bottom, Left |
| G4,I4,K4 | Top, Left | Bottom, Right |
| G9-G11 | Left, Bottom, Right | Top |
| H9-J9 | Top, Bottom, Left | Right |
| H10-J10 | Top, Bottom, Right | Left |
| H11-J11 | Top, Bottom | Left, Right |
| I5-K5 | Bottom, Right | Top |
| I6-K6 | Bottom, Left | Top |
| I7-K7 | Top | |
| I8-K8 | Bottom | Top |
| K9-K11 | Left, Right | Top, Bottom |
| L1-L3 | Bottom, Right | Left |
| L4-L6 | Bottom, Left | Right |
| L7-L9 | All | |
| L10-L12 | Left, Right | |
| M1-M3 | Top, Right | Left |
| M4-M6 | Top, Left | Right |
| M7-P7 | Top, Bottom | |
| O1-O3 | Left | |
| O4-O6 | Right | |
| P1-P3 | Right | Left |
| P4-P6 | Left | Right |
Some tile layouts can match more than one rule. When deciding between multiple matches, you should use the one that is most specific. For example, in the base zone B2-B4 matches "All", while B7-B9 matches "All, !TL, !TR". Due to not caring about the corners, any tiles that match B7-B9 would also match B2-B4. You should go with B7-B9 since has more specific rules.
This applies to matching tiles from multiple zones as well. Grass and Blend/Grass zones should be considered the same priority. Failing to find any matches, you should then drop to the Base zone and check for matches there. The Base zone is considered lower priority than the other zones.
You may have noticed that you could turn the matches and blends rules into a bitmask, and use a lookup table to speed up the comparisons. This is what Terrafirma does.
Cactus and wooden platforms do *not* use this method. Instead they have their own algorithms for determining which texture to use based on the tiles nearby.