The Minutor Pack Builder lets you build custom definitions for blocks, biomes, and dimensions. A collection of definitions is called a mod, and a collection of mods are called a pack.
In this tutorial, we'll show you how to create a quick addition, a mod, and a pack.
I have made available several "pre-made" packs. These contain definitions for widely used mod packs like the Feed The Beast Direwolf20 pack.
Since you can manually change the block ids for many mods in the pack, your installation could be unique. To compensate for this, these packs will use your forge configuration. You'll find out more about how this works in the Building a Forge Mod section.
First select the pack you wish to use. Then click . You will get a blue drop area that looks like the following:

This drop area is asking for your forge configuration file. It will use your configuration files to generate a pack customized to your installation.
Navigate to your minecraft folder. For example, if you are using the Direwolf20 pack and you installed it into a folder called ftb on your desktop, then you'll want to navigate to Desktop/ftb/Direwolf20/minecraft.
Inside this minecraft folder is a folder named config. You will want to drag that folder onto the drop area as shown below:

As soon as you drop the folder, your browser will download a zip file that contains the configured pack. You can now import this zip file into Minutor.
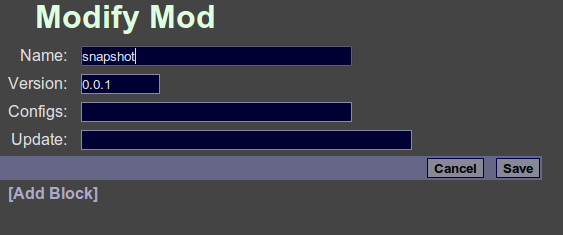
Now let's look at making a quick addition. Let's say that a new minecraft snapshot is out, and it adds 3 new blocks. The first is block ID 200, and called Awesome Block. The next is ID 200:1, which is Super Awesome Block.
Click down in Your Mods. Make sure New mod blocks is selected, this means we're creating a set of block ids. Give it a name, and click .
You should now see your mod listed in your mod list. Click on to edit this mod.
Now click on [Add Block] to add a block to this definition.
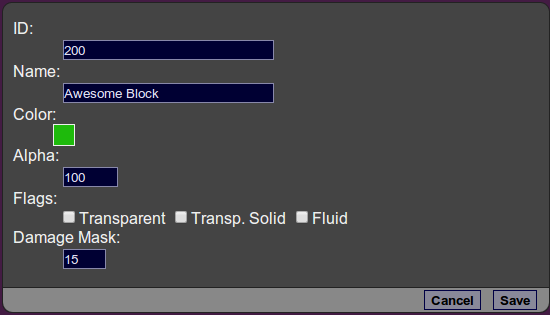
Fill out the form and hit .
Next we'll look at adding the Super Awesome Block. Recall that it had ID 200:1. The colon means that this block is the same as the Awesome Block except it has a damage value of 1. We represent this by saying it is a variant of 200.
In the block list, you should now see [Add Variant] under the Awesome Block. Click that to add a variant.
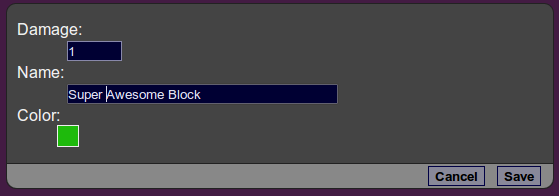
Fill this out, and hit .
You should see Super Awesome Block listed under the Awesome Block definition. Go ahead and hit on this page to save all your changes to the mod.
At this point you might be wondering where these things are actually saving to. You'll notice you can reload the page and your mod is still listed. These mods are saved to your browser's Local Storage.
This means these changes will only be visible to you, using this specific browser. If you wish to view and modify this mod on other browsers, or send to other people, you'll want to export this mod.
Simply select your mod and click . It should download a json document.
This json document can then be imported into Minutor, and doing so will add support for the Awesome Block and Super Awesome Block.
Since this file is in standard JSON format, you can also modify it using a text editor if you wish.
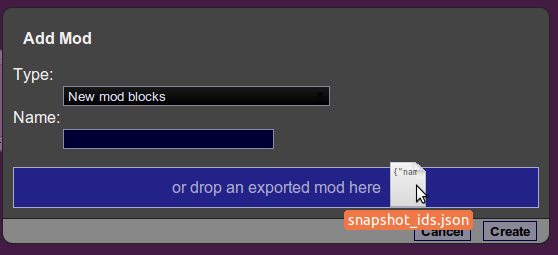
Now that you've exported a mod, you need to be able to import it back in. First, delete the mod we built in the previous section by selecting it and clicking . This will delete the mod, but won't affect the file you exported earlier.
Next hit , and you'll notice that below the Name field there is an area for dropping exported mods. Just drag your exported mod onto that box and drop it.
This will import the mod, and you can edit it and re-export it if you wish.
Creating a new forge mod definition from scratch is a lot of work, so to get your feet wet, we'll instead just extend an existing forge mod definition. This is something you might do anyway.
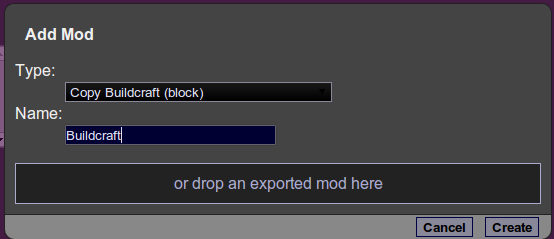
Let's say that Buildcraft has been updated and it has added a new block that your current definitions don't support. First we'll hit and select Copy Buildcraft (block) from the dropdown. What this does is take the pre-made buildcraft definitions and copy them into your new mod. Name it whatever you like.
Now we'll modify it. You'll notice the Configs field has buildcraft/main.conf. This is the path to the buildcraft forge configuration file, relative to the main config folder. This is actually a comma-separated list of config files, since a mod may have more than one.
Go ahead and track down main.conf on disk and open it in a text editor. You should see all sorts of configuration options. the block IDs listed. What we want is the variable name for our new block. This is the full variable name for the block, which includes all section names, plus the variable, minus the variable type.
For example, the Architect Table's id is block.architect.id since it is in the block section, its type is I: so we ignore that, and the variable name is the everything after the type.
So, let's imagine that this fictional Buildcraft version has added a new block id. Let's imagine you see I:magicbox.id=666 in the config file, inside the block section with all the other blocks. You open NEI in game and see that 666 belongs to a new block called Wish-Granting Box.
So, what we do is simply scroll to the bottom and click [Add Block].

You'll notice we put its forge variable name block.magicbox.id instead of 666. While 666 will work, if the config ever changes, updating our definitions file will be harder.
While we were checking this box out in NEI, we also noticed that it was pink, and even though it didn't take up a full block, we could stand on it. Therefore it was Transparent + Transp. Solid.
We leave damage mask at 15, because it doesn't have any variants.
Now, we save and we're done. Almost. You could "export" this mod, but you couldn't use it in Minutor because all the ids are forge variables. Whenever we use forge variables, we need to the mod with the forge configuration. But you'll notice there is no generate button for mods. In order to use this updated Buildcraft we'll want to make a custom pack.
If we want to Generate using forge variables, we'll want to create a custom pack.
Go ahead and , and give it a name. Then .
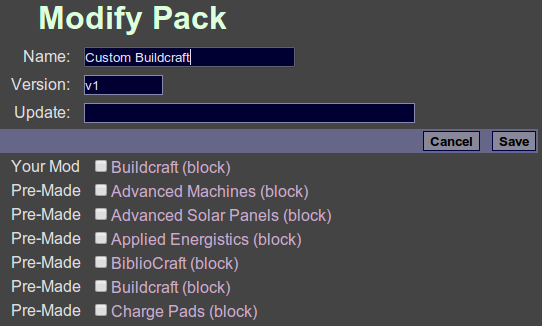
Finally there's the list of all the mods available. Your mods will always be listed first, followed by any pre-made mods.
Go ahead and check in your custom Buildcraft mod. You could check as many mods as you want in the pack. Since Minutor can load multiple definitions at once, we can make this one just override Buildcraft, the other packs will supply the other mods.
Then . Now hit .
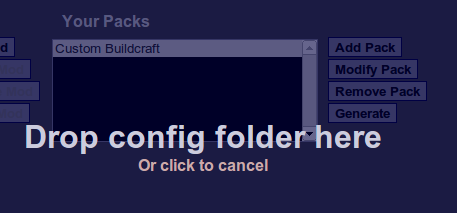
Minutor checks your pack and sees that you are using Forge Configuration variables. It now prompts you to drop your forge configuration folder onto the page. You learned how to do this with the pre-made packs, so go ahead and do it. It should then download a zip file with your custom pack. You can import this into Minutor, and your customized buildcraft pack will start working.
You now should have a grasp on how to do anything you need.. from making overrides that make diamonds stand out, to full packs that can be customized to your forge configuration.